Creating a backyard retreat doesn’t require a contractor’s budget or a trust fund. With strategic planning and a willingness to get hands dirty, homeowners can build an outdoor space that rivals high-end resorts, without the mortgage-sized price tag. The key lies in focusing on impactful projects that deliver maximum comfort and style per dollar spent. From repurposed materials to DIY installations, budget-friendly backyard transformations combine creativity with practical building skills. This guide walks through seven proven strategies to turn any yard into a personal oasis, covering everything from seating arrangements to water features, with realistic cost breakdowns and hands-on instructions.
Table of Contents
ToggleCreate a Cozy Seating Area with Affordable Furnishings
A functional seating area forms the backbone of any backyard oasis. Skip the $2,000 sectionals and build custom seating using 2×4 lumber and exterior-grade cushions.
Materials for a basic L-shaped bench (seats 4-6):
- Twelve 8-foot pressure-treated 2×4s ($4-6 each)
- Two 8-foot 4×4 posts for legs ($8-12 each)
- Exterior wood screws (2½” and 3″)
- Exterior stain or sealant ($20-30 per quart)
- Outdoor cushions or DIY foam wrapped in weather-resistant fabric
Cut the 4×4s into 18-inch legs. Frame the bench base using 2×4s as joists, spacing them 16 inches on center for proper support. Attach the seat deck with 2×4s laid flat, leaving ¼-inch gaps for drainage. Apply two coats of exterior sealant, allowing 24 hours between coats.
Total material cost runs $80-120 versus $400+ for comparable pre-built options. Those with access to patio design inspiration can find additional configuration ideas.
For an even cheaper route, source free pallets (check with local warehouses or garden centers). Heat-treated pallets marked “HT” are safe for outdoor furniture, avoid those stamped “MB” (methyl bromide treatment). Sand rough edges with 80-grit paper, reinforce loose boards with deck screws, and seal before use.
Add Ambiance with Budget-Friendly Lighting Solutions
Lighting transforms an ordinary yard into an evening destination. Commercial landscape lighting kits start at $200-300, but DIY alternatives deliver similar ambiance for under $50.
String lights remain the most cost-effective option. Commercial-grade C9 or C7 bulb strings (the larger ceramic base type) hold up better than miniature fairy lights. Expect to pay $25-40 for a 48-foot strand rated for outdoor use. Suspend them between posts, trees, or along fence lines using screw-in hooks or cable clips.
For permanent installation, run strands through ½-inch PVC conduit painted black, mounted to fence tops or eaves. This protects wires from UV degradation and creates a cleaner look.
Solar path lights have improved significantly. Quality units with replaceable AA NiMH batteries cost $3-5 each and provide 6-8 hours of illumination. Place them along walkways or cluster three together as accent lighting near seating areas.
DIY mason jar lanterns cost roughly $2 per unit. Drill a small drainage hole in the jar bottom (use a ⅛-inch glass/tile bit under running water to prevent cracking). Insert battery-operated LED tea lights or small solar puck lights. Hang from shepherd’s hooks or set on tables. Many homeowners executing entertaining backyard designs incorporate these as table centerpieces.
Safety note: Always use GFCI-protected outlets for plug-in lighting. Outdoor-rated extension cords should be 12-gauge minimum for runs over 25 feet.
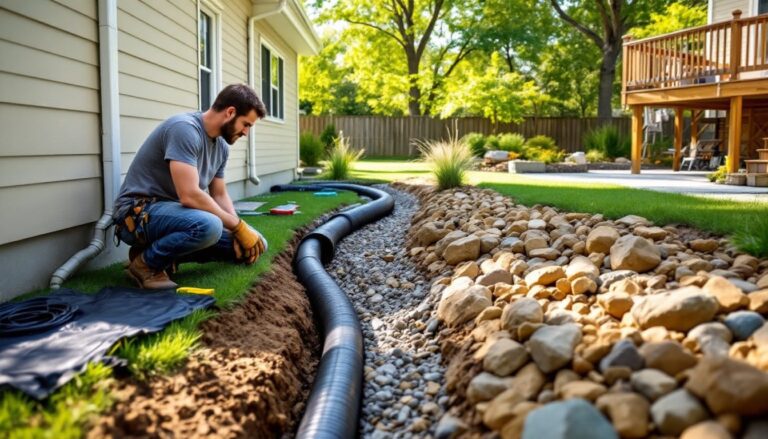
Incorporate Water Features for Under $100
The sound of running water adds a resort-like quality without the $500+ price tag of commercial fountains. A simple recirculating urn fountain can be built for $60-80.
Required materials:
- One ceramic or resin urn with drainage hole (thrift stores, $10-25)
- Submersible fountain pump (160-200 GPH rated, $20-30)
- 10-gallon plastic reservoir tub ($8-12)
- ¾-inch PVC riser pipe cut to height
- Decorative river rocks (40-50 lb bag, $8-15)
- Hardware cloth (½-inch mesh, $10 per 3×3-foot section)
- Dig a hole slightly larger than the reservoir tub and level it using a 2-foot spirit level.
- Place the tub below grade, with the rim 1-2 inches above ground level.
- Cut hardware cloth to span the tub opening with 6 inches of overhang on all sides.
- Position the pump in the tub center, threading the power cord out the side.
- Run PVC pipe from the pump outlet up through the hardware cloth.
- Set the urn over the pipe and adjust height so water flows over the rim.
- Cover hardware cloth with river rocks, concealing the mesh completely.
Fill the reservoir, plug in the pump (using a GFCI outlet), and adjust flow rate via the pump’s control valve. Check water levels weekly during hot weather, expect to add 1-2 gallons per week to offset evaporation.
Alternatively, a bubbling rock fountain uses the same reservoir method but replaces the urn with a large stone (20-40 lbs) drilled through the center. Many landscape supply yards will drill stones for $10-15. The budget-friendly garden hacks approach works well for smaller-scale water features.
Winter prep: In freeze-prone regions, drain the reservoir completely and store the pump indoors to prevent damage.
Design a Lush Garden Using Cuttings and Seeds
Instant gardens cost $500+ at retail, but strategic planting from cuttings and seed yields the same results for under $50. Patience is the trade-off, expect full establishment in one to two seasons.
Propagating from cuttings works exceptionally well for perennials. Take 4-6 inch stem cuttings from healthy parent plants (with permission if sourcing from neighbors). Best success rates come from semi-hardwood growth, new stems that have begun to firm up but aren’t fully woody.
Dip cut ends in rooting hormone powder ($5-8 per jar, lasts years) and plant in a 50/50 mix of perlite and peat moss. Keep consistently moist under indirect light for 3-4 weeks. Rooting indicators include new leaf growth and resistance when gently tugging the stem.
Highly successful cutting candidates:
- Lavender (8-10 plants from one mature shrub)
- Rosemary (root rate above 80%)
- Hydrangea (take cuttings in early summer)
- Sedum and succulents (nearly foolproof)
Seed starting requires minimal investment. A basic setup includes seed starting mix ($8 for 8 quarts), plastic cell trays ($3-5 reusable), and a seed heat mat ($15-20, optional but improves germination). Start seeds indoors 6-8 weeks before the last frost date.
Fast-growing, high-impact options:
- Zinnias (full bloom in 60 days, $2 per seed packet)
- Sunflowers (varieties from 3-10 feet tall)
- Morning glory vines (covers fences rapidly)
- Marigolds (pest-deterrent properties, prolific bloomers)
Direct-sow cool-season vegetables like lettuce, spinach, and radishes in early spring. A $3 seed packet yields 50+ plants.
Soil prep makes the difference. Amend existing soil with compost (free from municipal programs in many areas) or composted manure ($3-5 per 40 lb bag). Till or turn to a depth of 6-8 inches. The platform Better Homes & Gardens offers seasonal planting calendars by USDA zone.
Build DIY Shade Structures for Comfort and Style
Shade transforms a yard from occasionally usable to comfortable all summer. Commercial pergolas start at $800-1,200, but DIY construction costs $200-400 in materials.
Basic freestanding pergola (8×10 feet):
- Four 4×4 pressure-treated posts, 10 feet long ($15-20 each)
- Four 2×8 beams, 10 feet long (for perimeter, $12-18 each)
- Six 2×6 rafters, 8 feet long (for top slats, $8-12 each)
- Galvanized carriage bolts (½” × 6″), washers, and nuts
- Post anchors or 60-lb bags of concrete mix ($4-5 each)
- Exterior wood screws and joist hangers
This project requires intermediate carpentry skills and two people for beam installation. Check local building codes, many jurisdictions require permits for structures over 120 square feet or those attached to the house.
- Mark post locations precisely, use the 3-4-5 triangle method to ensure square corners (measure 3 feet on one side, 4 feet on an adjacent side: diagonal should equal exactly 5 feet).
- Dig post holes 12-18 inches in diameter, extending below the frost line (typically 24-48 inches depending on region).
- Set posts in concrete or bolt to pier blocks for easier future removal.
- Attach 2×8 beams to post tops using carriage bolts, countersinking heads flush.
- Space 2×6 rafters 16-18 inches on center, securing to beams with joist hangers or angled screws.
- Apply two coats of exterior stain or leave to weather naturally.
For shade without full construction, install shade cloth (50-70% density, $40-60 for a 10×12-foot section) over an existing structure or between posts. UV-rated fabric lasts 5-7 years.
Cantilever umbrella alternative: A 9-foot market umbrella with a cross-base stand (filled with sand for stability) costs $60-100 and requires zero installation. Those working on backyard entertaining spaces often combine fixed and portable shade solutions.
Safety reminder: Always wear safety glasses when cutting lumber and ear protection when using power tools. A miter saw delivers cleaner angle cuts than a circular saw for rafter ends, but both work.
Upcycle and Repurpose Items for Unique Décor
The cheapest materials are the ones already owned, or the ones neighbors are throwing away. Upcycling turns potential trash into custom yard décor for the cost of paint and hardware.
Cinder block planters cost $1.50-2.50 per block at home centers. Stack them dry (no mortar) to create modular planters. The hollow cores accept 6-inch potted plants or can be filled with potting soil directly. A 4-block configuration (two base, two stacked) costs under $10. Paint with masonry primer and exterior latex in custom colors for a high-end look ($15-20 total).
Pallet projects remain popular for good reason, they’re free and versatile. A vertical pallet garden mounts to a fence or exterior wall. Sand the pallet, staple landscape fabric to the back and bottom (leaving the top open), fill horizontal slats with soil, and plant with herbs or succulents. Mount using lag bolts into wall studs or fence posts.
Old ladder shelving provides instant vertical storage. Lean an A-frame ladder against a wall or fence (secure the top with a hook to prevent tipping). Use the rungs to display potted plants, lanterns, or watering cans. Apply exterior polyurethane if the wood is bare.
Tire planters divide opinion on aesthetics, but they’re nearly indestructible and free from tire shops. Stack two or three tires, bolt together, and fill with soil. For less industrial appearance, wrap in jute rope secured with construction adhesive, or paint with exterior primer rated for rubber surfaces. The blog Making Manzanita showcases multiple tire transformation techniques.
Broken terra cotta pot fairy gardens turn damaged pots into whimsical displays. Layer the broken pieces to create terraced levels, plant with moss and small sedums, and add miniature accessories (available at craft stores).
Tin can lanterns require only cleaned food cans, a hammer, and a nail. Fill the can with water and freeze solid (prevents denting). Mark a pattern with a marker, then punch holes along the lines with a nail and hammer. Spray paint if desired, insert a votive candle, and hang with wire handles.
Storage solutions matter too, builders finishing a storage and entertaining station find that repurposed cabinets or deck boxes extend functionality without added cost.
Safety note: Wear work gloves when handling rough materials like pallets and cut metal. Watch for protruding nails and sharp edges.
Conclusion
Building a backyard oasis on a budget comes down to prioritizing labor over purchased products. Every project outlined here trades time and basic carpentry for significant cost savings, a fair exchange for DIYers comfortable with a saw and drill. Start with one high-impact project like seating or lighting, then expand as skills and budgets allow. The backyard doesn’t transform overnight, but incremental improvements compound into a space worth spending time in.