A backyard greenhouse transforms a homeowner’s relationship with gardening. It extends growing seasons by months, protects tender plants from frost, and provides a dedicated space for starting seeds, overwintering tropicals, or cultivating year-round salad greens. Whether working with a sprawling suburban lot or a narrow side yard, there’s a greenhouse design that fits the footprint and budget. From salvaged window frames to polycarbonate kits, these structures blend function with landscape appeal while giving growers control over temperature, humidity, and pest exposure. This guide covers practical designs, budget-conscious builds, and features that make a greenhouse work harder, all tailored for the DIYer ready to expand their growing space.
Table of Contents
ToggleKey Takeaways
- Backyard greenhouse ideas extend growing seasons by 6–8 weeks in temperate zones and enable year-round cultivation of heat-loving crops like tomatoes, peppers, and basil while protecting plants from wildlife and weather damage.
- Small-space solutions such as mini hoop houses, lean-to structures, cold frames, and vertical tower greenhouses allow homeowners with compact yards to implement backyard greenhouse designs without sacrificing functionality.
- DIY greenhouse builds—including hoop houses, cattle panel structures, and salvaged window designs—can be completed in a weekend for $120–$350 and offer significant cost savings and customization compared to pre-built kits.
- Essential features like ventilation systems (15–20% of floor area), benches at 30–36 inches high, automated drip irrigation from rain barrels, and proper flooring ensure a greenhouse performs optimally year-round.
- Budget-friendly greenhouse options under $500, such as PVC hoop houses and recycled window structures, deliver season extension and plant protection while leveraging affordable or reclaimed materials.
- Thoughtful material choices—cedar framing, polycarbonate panels, matching trim colors to home siding—transform a backyard greenhouse from a utilitarian structure into a landscape focal point that enhances curb appeal and property value.
Why Every Homeowner Should Consider a Backyard Greenhouse
A backyard greenhouse isn’t just for serious gardeners, it’s a practical addition for anyone who wants fresher produce, healthier houseplants, or a head start on spring planting. Season extension is the primary benefit: even an unheated cold frame can push harvest dates into late fall and restart them in early spring. In USDA zones 5–7, a basic hoop house adds 6–8 weeks to the growing calendar. Heated structures allow year-round cultivation of cold-sensitive crops like tomatoes, peppers, and basil.
Greenhouses also protect plants from wildlife, wind, and hail. Deer can’t browse seedlings, and sudden storms won’t flatten young transplants. For homeowners propagating perennials or starting hundreds of annuals from seed, the controlled environment means higher germination rates and stronger root development.
From a property value perspective, a well-built greenhouse signals care and sophistication to potential buyers, especially in regions where gardening is a lifestyle priority. It’s a functional structure that enhances curb appeal when designed with thoughtful materials and placement. And unlike a garden shed, it actively contributes to food security and hobby fulfillment every month of the year.
Small-Space Greenhouse Solutions for Compact Yards
Limited square footage doesn’t eliminate greenhouse options, it just shifts the focus to vertical growing and compact footprints. Mini hoop houses (4′ × 4′ or smaller) fit against fences or garage walls, using PVC hoops covered with 6-mil greenhouse poly. These cost under $50 in materials and take a weekend to assemble. They’re ideal for starting seedlings or hardening off transplants in spring.
Lean-to structures are another efficient use of tight spaces. By sharing a wall with a garage, shed, or south-facing house exterior, builders cut material costs and gain thermal mass from the existing structure. A 4′ × 8′ lean-to provides roughly 32 square feet of bench space, enough for dozens of flats. Make sure the adjacent wall isn’t load-bearing if mounting rafters directly, and check local setback requirements before anchoring to the foundation.
Cold frames work when ground space is minimal but raised beds exist. A simple frame made from 2×12 lumber topped with an old storm window or polycarbonate panel creates a microclimate for greens like spinach, lettuce, and arugula. These entertaining backyard designs can incorporate cold frames along paths or near patios without dominating sightlines.
Vertical shelving greenhouses (sometimes called tower or ladder greenhouses) measure as little as 2′ × 3′ and stand 5–6′ tall. They suit balconies, decks, and narrow side yards. Zippered clear PVC covers provide wind protection, though ventilation is limited, best for humidity-loving seedlings or leafy greens in cool months.
DIY Greenhouse Ideas You Can Build This Weekend
For homeowners ready to swing a hammer, a DIY greenhouse offers customization and cost savings. Hoop houses are the quickest builds: drive 3’–4′ lengths of ½” EMT conduit into the ground along both sides of a raised bed, bend them overhead, and secure with ridge purlin clamps or zip ties. Cover with UV-stabilized poly (look for 4-year or 6-year ratings), and anchor the edges with sandbags or buried board. A 10′ × 12′ hoop house runs $150–$250 in materials and takes 4–6 hours to complete.
Cattle panel greenhouses use 16′ galvanized livestock panels (4′ tall, available at farm supply stores) bent into arches and anchored to 4×4 posts set 2′ deep. The rigid grid supports poly or shade cloth and stands up to wind better than PVC. These structures last 10+ years with minimal maintenance. Budget $200–$350 for a single-arch design.
Salvaged window greenhouses suit builders with access to old storm windows or French doors. Frame a simple 2×4 stud wall structure, sheath the roof with corrugated polycarbonate panels, and mount the windows in the walls using construction adhesive and exterior screws. This approach creates a charming, cottage-style greenhouse while diverting materials from landfills. Expect to spend a weekend on framing and another half-day on glazing.
Safety note: Wear gloves and safety glasses when handling metal conduit or cutting lumber. If using power saws, ear protection is essential.
Lean-To and Attached Greenhouse Designs
Lean-to greenhouses share one wall with an existing structure, typically a south- or west-facing garage, shed, or house wall. This design cuts material costs by 25–30% and simplifies foundation work. The shared wall also provides thermal mass, moderating temperature swings and reducing heating costs in winter.
Framing a lean-to starts with a ledger board (usually a 2×6 pressure-treated) lag-bolted to the existing wall studs. Run 2×4 or 2×6 rafters from the ledger to a front beam supported by 4×4 posts. Roof pitch should be at least 4:12 to shed snow and rain. Cover rafters with 8mm twin-wall polycarbonate panels for insulation and diffused light. These panels span up to 4′ between supports and offer an R-value around 1.6, better than single-pane glass.
Ventilation is critical in lean-tos because the shared wall limits cross-breeze. Install at least one roof vent or louver fan near the ridge and a vent or door at floor level on the opposite end. Without airflow, summer temps can spike above 110°F, stressing plants and inviting fungal disease.
Permitting varies by jurisdiction: structures under 120 square feet and not permanently affixed to a foundation often qualify as accessory structures exempt from permits, but always confirm with the local building department. If the lean-to abuts living space and shares HVAC or electrical, a permit is typically required.
Stylish Greenhouse Designs That Enhance Your Landscape
A greenhouse doesn’t have to look utilitarian. Thoughtful material choices and architectural details turn it into a focal point. Victorian-style greenhouses feature decorative ridge cresting, finials, and painted wood frames, often in forest green, white, or charcoal gray. These designs pair well with historic homes and formal gardens, though they demand more carpentry skill and cost $2,000–$5,000 for a kit.
Modern A-frame greenhouses use clean lines and minimal framing, often with black or dark bronze aluminum extrusions and clear or smoked polycarbonate. They suit contemporary landscapes and offer excellent snow-shedding geometry. An 8′ × 10′ A-frame kit typically runs $1,200–$2,500.
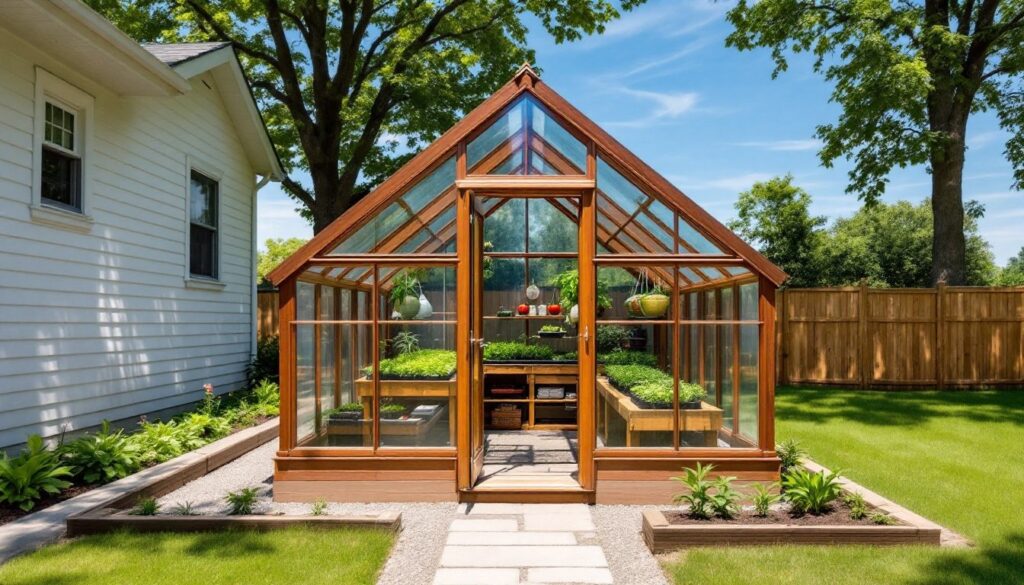
Cedar-framed greenhouses age to a silver-gray patina that blends with naturalistic gardens. Western red cedar resists rot without chemical treatment, making it a low-maintenance choice for humid climates. Pair it with corrugated fiberglass or polycarbonate panels for a rustic-meets-functional aesthetic. These are cool backyard entertaining ideas when positioned near outdoor dining areas, guests appreciate the lush backdrop.
Geodesic dome greenhouses maximize internal volume and withstand high winds, though they require precise angle cuts (usually 26.5° and 36° for a 3/8-sphere design). Hubs are available from specialty suppliers, or fabricate them from ¾” plywood gussets. Covering the triangular facets with poly or polycarbonate takes patience but yields a striking sculptural form.
For a cohesive look, match the greenhouse roof material or trim color to the home’s siding or roofing. Paint PVC hoops with exterior latex (after scuffing with sandpaper for adhesion) to coordinate with fencing or outbuildings.
Budget-Friendly Greenhouse Options Under $500
Building a functional greenhouse on a tight budget is absolutely doable, it just requires prioritizing structure over aesthetics and leveraging recycled materials. Pop-up greenhouses (often marketed as portable or walk-in models) cost $80–$200 and assemble in under an hour. They use a tubular steel frame with zippered PVC covers and roll-up doors. Longevity is limited (2–3 seasons in full sun), but they’re excellent for renters or trial runs.
PVC hoop houses remain the most cost-effective DIY option. A 10′ × 12′ structure built from 1″ schedule 40 PVC pipe and 6-mil UV-treated poly costs $120–$180. Use PVC cement on joints for rigidity and anchor hoops to rebar stakes driven 18″–24″ into the ground. Double-layer poly with a small air gap (using poly inflation fans or spacers) boosts insulation and extends the cover’s life.
Recycled window greenhouses cost almost nothing if sourcing windows from renovation sites, salvage yards, or online marketplaces. A 6′ × 8′ structure using 12–16 old windows on a simple 2×4 frame runs $200–$300 when factoring in lumber, screws, and a few sheets of corrugated roofing. Mismatched window sizes add character but complicate framing, plan the layout on graph paper first.
Cold frames built from scrap lumber and an old storm door or shower enclosure panel can be assembled for under $50. They’re particularly effective when placed against a south-facing foundation where they benefit from ground warmth and reflected heat. Studies on extending the growing season show even unheated cold frames can protect crops down to 20°F.
Budget builds require trade-offs: expect less insulation, shorter material lifespan, and more hands-on maintenance. But they deliver the same core benefits, season extension and plant protection, at a fraction of the cost.
Essential Features to Include in Your Backyard Greenhouse
A greenhouse is only as effective as its systems. Start with ventilation: passive vents (roof or gable) should total at least 15–20% of floor area. For structures over 100 square feet, add a thermostat-controlled exhaust fan (around $80–$150) to prevent heat buildup. Intake vents near ground level allow cool air to replace hot air expelled at the ridge.
Benches and shelving maximize vertical space. Build simple benches from 2×4 frames topped with ½” hardware cloth or expanded metal mesh, both allow drainage and air circulation. Position benches 30″–36″ high for comfortable working height. Wall-mounted shelves above benches can hold propagation trays or small pots.
Watering systems range from hand-watering with a hose to automated drip irrigation. A gravity-fed drip system using a 50-gallon rain barrel and ¼” drip tubing costs $60–$100 and eliminates daily watering chores. Add a battery-operated timer for true automation. Many homeowners are exploring gardening tips to integrate water-efficient systems into greenhouses.
Shade cloth (30–50% density) prevents mid-summer scorching. Attach it to the interior or exterior with clips or a roll-up system for adjustability. In climates with intense sun, shade cloth is non-negotiable for heat-sensitive crops.
Heating isn’t always necessary, but a small electric heater (with a built-in thermostat) prevents freeze damage in winter. Size it at roughly 10 watts per square foot for basic frost protection. Propane and natural gas heaters work but require proper venting to prevent CO₂ buildup, consult local codes.
Flooring choices include gravel (excellent drainage, weed suppression with landscape fabric underneath), poured concrete (permanent, easy to clean), or compacted stone dust (budget-friendly, decent drainage). Avoid untreated soil floors in humid climates, they invite pests and mud.
Electrical service supports fans, heaters, and grow lights. Running a buried 12/2 UF-B cable from a house panel to a greenhouse subpanel is straightforward for those comfortable with electrical work, but hiring a licensed electrician ensures NEC compliance and safety. Permit requirements apply in most jurisdictions for any electrical rough-in.
Finally, gutters and downspouts capture rainwater for irrigation and prevent foundation erosion. Even a small 8′ × 10′ greenhouse can harvest 300+ gallons during a typical rainy season. Route downspouts to rain barrels or underground cisterns for storage. For additional home improvement how-tos, homeowners can find step-by-step guidance on gutter installation and water catchment systems.
Tool checklist for most DIY greenhouse builds:
- Circular saw or miter saw (for framing cuts)
- Cordless drill/driver with assorted bits
- Level (4′ or laser)
- Tape measure (25′)
- Post-hole digger or auger
- Staple gun (for attaching poly)
- Utility knife (for trimming poly or panels)
- Safety glasses, gloves, ear protection
With these features in place, a backyard greenhouse becomes a year-round asset, not just a seasonal accessory.